Monday, April 28, 2014

Finally, Peanut Butter Cup Cupcakes! (and baking pan grease)


I have been wanting to try this idea out forever. I tried it Easter weekend with minis but my cupcakes wouldn't come out of the pan (yes, there was a reason I didn't use cupcake liners!).

I also found a recipe for baking pan grease somewhere in the comments of some blog or yahoo answers page. I am SO sorry I don't remember which or I would give credit where it's due. It is said to be something commonly used in bakeries, though I have never worked in a bakery (or food service at all for that matter) so I wouldn't know.

Baking Pan Grease
1 cup shortening
1 cup oil ( I used Canola)
1 cup flour

I threw them all in a bowl and blended with my mixer on high til smooth. I put mine in a Tupperware container and put it in the fridge. I don't know if that is necessary though. To use just brush on with a pastry brush.
 
 
Peanut Butter Cup Cupcakes
This is the same recipe I used last time. This time I made full sized cupcakes and used the above baking pan grease and they popped right out!

Peanut Butter Cupcakes from In the Kitchen with KP. I got about 36 cupcakes. They were a little flat but they were sturdy and moist, which was perfect for this project.


The batter is thick and delicious. If you eat too much of it then I cant guarantee how many cupcakes you will get out of the recipe. It is seriously good batter.

 
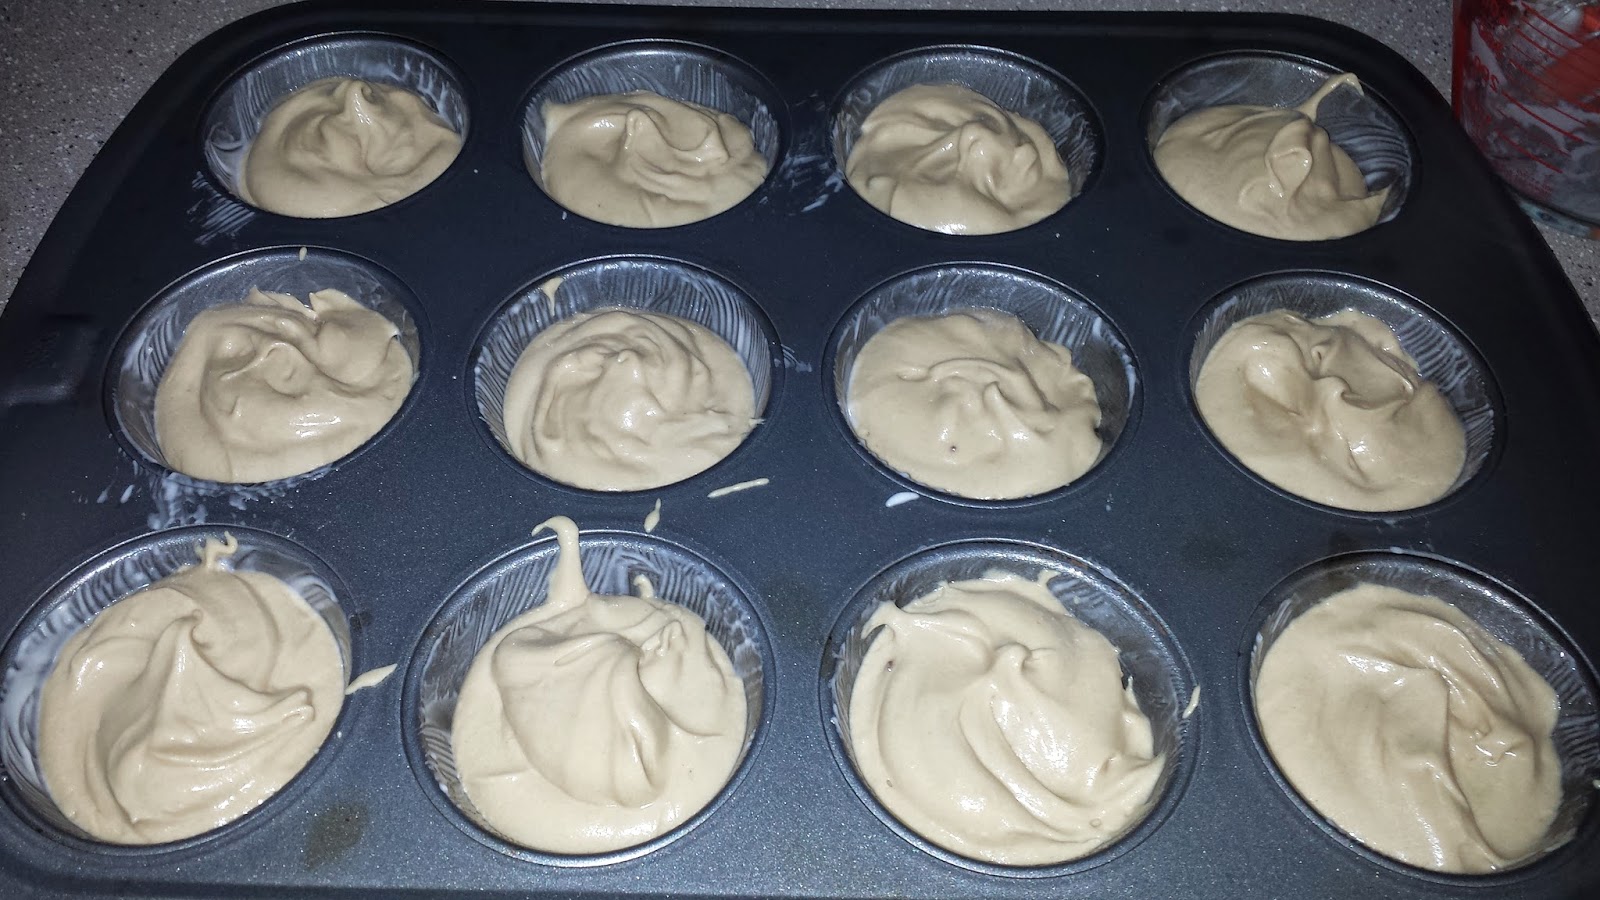
Thick batter makes it easier to get into the tins, yay! Make sure you DON'T use any liners!

(I forgot to take a picture of them straight out of the oven)

I looked up a ton of different peanut butter cream filling recipes and borrowed from all of them. Here is what I came up with:

Peanut Butter Cream Cheese Filling

1 cup creamy peanut butter
8 oz cream cheese, softened
1/2 cup butter, softened
4 cups powdered sugar (approximately)
1 tsp vanilla bean paste (or pure vanilla extract)
2 tablespoons-ish milk

Cream together the first 3 ingredients until smooth and beat in the powdered sugar. Get it nice and fluffy and a little on the stiff side (Sorry! I rarely actually measure these types of things). Mix the vanilla and enough milk to get it to your desired filling consistency. I had about half a recipe left over after filling mine, it's going in the fridge. I always like having frosting and fillings on hand! It would make a delicious brownie topping!

Once your cupcakes are cool, pop the centers out of them with a fork and fill them. I stabbed a fork halfway through them to form a circle and pried them out (boy, I make it sound like work).


If you have a melon baller, feel free to use one, I just don't have one. Also, for neater cupcakes, you can always pipe the filling in. Once filled, I put the tops back on. I did find that I needed to shave off about half the cake attached to the top in order for the top to fit back on decently. Take one guess where the middles went.

Melt about 3/4 of a package of almond bark (about 10 ounces). I microwaved mine in a wide mouthed glass measuring cup (2 cup size). Dip the cupcakes about 3/4 of the way in. I was going to go all the way to the rim but I realized for the sake of slightly cleaner fingers (while making them and eating them), I should leave a little room to hold the cupcake.


All that's left is to frost and enjoy!
 
 
Chocolate Fudge Frosting
 
This one is seriously a little all over the place because I didn't want to go to the store and I wanted it deliciously chocolatey.
 
3/4 cup evaporated milk
1 cup milk chocolate chips
1 cup cocoa powder
1/2 cup butter, softened
4-5 cups powdered sugar
1 tsp vanilla bean paste (or pure vanilla extract)
2-3 tablespoons of milk

In a small saucepan, heat the evap milk over low heat and add in the chocolate chips. Stir until melted and combined. In a medium bowl, add cocoa powder and melted chocolate. Beat on medium with a hand mixer until smooth. At this point I added 2 cups of powdered sugar and mixed again. When it was smooth and I was sure it wouldn't melt the butter I tossed that in there too and continued mixing. I added in the vanilla and the rest of the powdered sugar. Add in a few tablespoons of milk until it's a nice piping consistency. Fill up a bag and frost. I used a 1M tip. Here are the rest of the pics!


 Enjoy. These are rich, delicious and definitely worth the work.


Sunday, April 13, 2014

PB Cup Cupcakes

These are the other cupcakes I brought to the shower. I had pinned the recipe on everyone's favorite time waster (guilty as charged) and the mom-to-be liked it so I figured I better give this one a go! 
Here is the recipe I used. Erica's Sweet Tooth has some awesome looking recipes! I made the recipe exactly as written and they turned out delicious! We got rave reviews on these ones as well. I found some mini Reese's pb cups so we used those for toppers!


I have a very cool idea brewing the back of my mind for some extremely awesome Reese's inspired cupcakes so as soon as I get a chance I will make and post them!

Vanilla Cupcakes with real vanilla bean paste

The baby shower cupcakes were a huge success, at least with flavor. For some reason, my mini white vanilla cupcakes sunk and yet the few full sized ones I made turned out great with a decent dome. The flavor was awesome. Let's talk about those vanilla ones first. Here is the recipe I used for the cupcakes and the frosting. I had previously tried the cupcake recipe listed with the frosting recipe but I wasn't that thrilled with my results. They didn't seem to rise much and the texture was off. Totally could have been something I did. I do have some tips and adaptations for you so here they are!


The Cupcakes - The method was a new one for me. It has you measure all the dry ingredients and the sugar and then use your electric mixer to cut in the butter. In the recipe she calls for softened butter, cut into chunks then added to the flour. I had to throw my butter in the fridge in order to get it firm enough to cube. Once I had it in the flour I quickly realized that softened butter was not the way to go. I threw mine into the freezer and let it firm up before I finishing cutting it in. That was really my only change to the recipe. Otherwise there is NO WAY it could have ended up in the "crumb" state we were looking for.


 I have a feeling the down fall I experienced was related to the size considering the full-sized cupcakes turned out great. I think I got 48 cupcakes and 6 regular sized out of the recipe.

The Frosting - The recipe as written is wonderful, but since my cupcakes were light and fluffy (like I could resist trying them?) and the day was warm and springy I wanted something a little lighter than traditional buttercream. I ended up added bother tablespoons of cream and adding about a cup full of cool whip and folding it in at the end. It was perfect. I loaded the light, speckle-y vanilla bean frosting into a bag with a 1M tip and they were frosted in minutes. 

Sorry this pic isn't the best but according to everyone at the shower, they were a smashing success!


Friday, April 11, 2014

Vanilla Bean Paste + Cupcakes

Whilst looking up recipes for a vanilla cupcake recipe for an upcoming baby shower, I came across this recipe for Perfect Vanilla Cupcakes. After reading Dorothy's description of the sinful sounding vanilla she had going on there (who knew VANILLA could be sinful?!?!), I was convinced I needed to get me some vanilla bean paste. I researched a bit. Apparently it's not that easy to come by. Since I have been so busy with work lately and a deadline coming up, I opted to order some online from amazon. I grabbed some of this Nielsen-Massey Vanilla Bean Paste and got 2-day shipping (never so happy I forgot to cancel our Prime membership, I love the free shipping!).


First of all, it smells divine, looks like syrup and comes in an old-timey looking bottle, I was pleased. I tried it out on the Perfect Vanilla Cupcakes recipe I mentioned above. They turned out pretty decent. They didn't quite dome the way I like them to but they were definitely delicious.

Instead of the frosting and vanilla filling, since this was a test batch, I opted for some of the homemade caramel I had in the fridge with a little ground sea salt on top. Wowza. Simple and not overly sweet or complex. Just simple vanilla and caramel with a touch of salt to keep that sugar in line. Next time I make caramel I will definitely post my pictures but this is the video I used to figure out how to make caramel without a candy thermometer! I didn't use the recipe in the video but her how-to is clear and easy to follow.


New blog and a fresh start

I'll be honest, I've tried this blogging thing before. It's tough. Honestly, I don't know how some of these ladies do it! (I say ladies because I mostly read the blogs of ladies, sorry fellas). I think my problem last time was trying to be too perfect about it and having this long back story and witty agenda.
So today is just an quick intro and my latest cupcake.

Quick intro: My name is Rayah and I am a wife and working mom of one radical four-year old. My husband, Richie, and I both work swing shifts so our schedule is off from the norm, but it works right now for our family.

I love to bake. I especially love biscotti. I have just started becoming more adventurous when it comes to tweaking recipes and such. I love cooking in general, so I will be sharing those recipes as well. I added "Homemaking" into the blog name too because I wont be able to resist throwing my DIY projects up here too, which can be varied and random.

I'm not a professional photographer, there won't be fancy pictures!

That is all.